Merry Christmas Card Laser Papercut: A Practical Guide to Flawless Holiday Creations
The holiday season is defined by the personal touch, and nothing conveys warmth quite like a handcrafted greeting. Merry Christmas Card Laser Papercut designs have surged in popularity because they offer an intricate, high-end aesthetic that feels impossible to achieve by hand alone. Whether you are running a small business selling handmade cards or simply want to send unique invitations to family, these digital files bridge the gap between professional design and DIY craftsmanship. However, the path from a downloaded file to a finished masterpiece is paved with specific technical requirements. Many creators rush into cutting without understanding the nuances of their machine or paper weight, leading to frustration rather than festive joy.
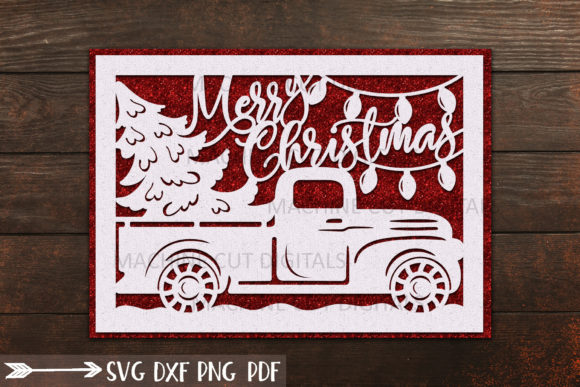
Before you hit the "cut" button, it is essential to understand what this design actually offers. The collection features a stunning 3D papercut effect centered around a classic Merry Christmas theme, often incorporating a charming truck motif viewed in a 360-degree perspective. This isn't just a simple outline; it is a layered composition designed to create depth. The package includes a Rectangle Background for a flat, modern look and an Insert Fold option for traditional card-making enthusiasts. By layering these elements, you transform a flat sheet of paper into a dynamic scene that catches the light and the eye.
Navigating Machine Compatibility: Laser vs. Blade Cutters
One of the most common pitfalls involves assuming that a single file works perfectly on every type of machine. While the Merry Christmas Truck 360_2 design is versatile, the way your machine interprets the vector lines differs significantly between laser cutters and blade-based devices. If you are using a Glowforge or similar laser cutter, the software relies on vector paths to determine burn intensity. You must ensure your design software can read the SVG or DXF formats correctly before sending them to the laser bed. Conversely, if you are working with blades on a Cricut, Silhouette, or ScanNCut, the cutting force and speed settings require different calibration.
A frequent error occurs when users attempt to cut complex, multi-layered papercuts on machines not calibrated for fine detail. For instance, the delicate connections in the truck's wheels or the intricate patterns on the Christmas tree background can snap if the pressure is too high or the blade is dull. It is crucial to remember that these files are not "one-size-fits-all." You must adjust your material settings based on the specific brand of your machine. What works on a standard Cricut Explore might jam a Silhouette Cameo if the mat tension or blade offset isn't adjusted. Always run a test cut on scrap paper first; this small step saves hours of re-cutting and wasted materials.
The Critical Role of Paper Weight and Dimensions
Choosing the right paper is arguably more important than choosing the right machine. The instructions explicitly recommend using cardstock ranging from 80 to 100 lb. This weight is non-negotiable for achieving the structural integrity required for 3D papercut designs. Thinner paper, such as standard copy paper or lightweight cardstock, lacks the rigidity to hold the layers apart, causing the final card to collapse or look flat and unimpressive. On the other hand, paper that is too thick may be difficult to fold cleanly or may not fit within the laser's focal range.
Another area where beginners often stumble is sizing. To ensure the design looks proportional and fits standard envelopes, the unfolded card should measure no less than 5x7 inches, with 10x7 inches being the ideal size for the insert fold version. Cutting the design smaller than recommended compresses the details, making the truck and background elements indistinguishable. When scaling down, the tiny bridges connecting the papercut layers become fragile and prone to breaking during the weeding process. Always verify your dimensions in your design software before committing to the full sheet of expensive cardstock.
Understanding File Formats and Organization
Upon purchase, you will receive a ZIP folder containing various formats: SVG, DXF, PDF, and PNG. Each serves a distinct purpose, and misunderstanding their roles can lead to compatibility issues. The SVG and DXF files are the workhorses for cutting machines, containing the vector data necessary for precise cuts. The PNG file is strictly a preview image; it is a raster graphic used to help you identify which specific element you need to open in your vector software. It cannot be cut directly by a laser or blade machine.
If you are creating bundles where every design element is a separate file, organization becomes key. Do not assume that all parts of the truck or background are grouped together in a single layer. In many cases, the wheels, the cab, the cargo, and the background rectangle are individual objects. Your machine software must be able to handle multiple independent layers simultaneously. If you try to cut a group of ungrouped elements without separating them, you might end up with a messy pile of cut pieces that don't align. Take the time to ungroup the layers in your software (like Adobe Illustrator, Inkscape, or Cricut Design Space) and assign different colors to each layer to visualize the assembly order.
Common Pitfalls and How to Avoid Them
Several subtle mistakes can ruin the presentation of your final product. One major oversight is forgetting that backgrounds are not included in the base design files unless specified. Some users expect a pre-made backdrop and are confused when they only receive the central papercut elements. You will need to source or design your own background texture or color to complement the truck and card elements. Additionally, always check your machine software capabilities before purchasing. Not all entry-level software supports the specific coordinate systems or layer types found in professional DXF files.
Another significant issue arises from improper handling of the downloaded ZIP file. If you attempt to access the files while they are still compressed, your cutting software may fail to recognize the vectors, resulting in errors or blank pages. You must unzip the folder completely before opening any files. Furthermore, be aware that there are no watermarks on the usable files, but the preview images might differ slightly in resolution. Use the PNG preview only as a visual guide to locate the correct SVG or DXF file for your specific project needs.
Maximizing Quality and Satisfaction
To truly elevate your holiday creations, focus on the finishing touches. Once your layers are cut, use tweezers to carefully remove the negative space (weeding). For the laser-cut versions, clean away any charred residue gently with a soft brush to reveal crisp edges. When assembling the 3D truck, use foam adhesive dots to create the necessary spacing between layers, ensuring the truck pops off the page. This attention to detail transforms a simple paper cut into a keepsake that recipients will cherish.
By respecting the technical specifications—such as paper weight, machine settings, and file formats—you avoid the disappointment of failed cuts and wasted materials. The Merry Christmas Card Laser Papercut design is a powerful tool for creators of all levels, provided you approach it with preparation and precision. Whether you are a seasoned entrepreneur looking to scale your holiday inventory or a hobbyist wanting to make a memorable gift, understanding these nuances ensures your final result is as beautiful as the original design intended.