A2 Graduation Card: The Smart Guide to Flawless DIY Designs
There is a specific kind of magic that happens when you hand someone a graduation card you made yourself. It transforms a standard congratulatory message into a cherished keepsake that sits on a desk or shelf for years to come. However, the path from a digital file idea to a physical masterpiece is often paved with small technical hurdles that can ruin the final look if not addressed early. This is where understanding the A2 Graduation Card format and the files behind it becomes essential.
An A2 size card measures 4.25 x 5.75 inches when folded, making it the industry standard for professional-looking invitations and greeting cards. It strikes the perfect balance between being substantial enough to hold a heartfelt message and compact enough to fit in standard envelopes without extra postage. When you choose an A2 Graduation Card design that comes in compatible SVG and PNG formats, you are unlocking the ability to create high-quality prints using your favorite cutting machines like Silhouette Studio, Cricut Design Space, or Scan N Cut. But before you hit "send" on your purchase or download, there are critical details you must verify to ensure your project doesn't end up as a pile of wasted vinyl and paper.
The Hidden Pitfalls of File Compatibility
One of the most common frustrations creators face is assuming all digital cut files work exactly the same way across different software platforms. You might see a product listing promising compatibility with Adobe Illustrator, Cricut, and Silhouette, only to find that the layers are grouped incorrectly or the paths are broken when you open them. This isn't just a minor annoyance; it can lead to hours of frustration trying to ungroup elements that refuse to separate or lines that won't cut because they aren't recognized as vector paths.
When evaluating an A2 Graduation Card file, always check the file extension first. If you are using a machine like Cricut or Silhouette, you need an SVG (Scalable Vector Graphics) file. Unlike raster images (like JPEGs or standard PNGs), SVGs contain mathematical data that tells your cutter exactly how to move the blade. If you try to cut a low-resolution PNG as if it were a vector, the machine will either fail to recognize the image or produce jagged, pixelated edges that look unprofessional. Always ensure the package includes both SVG and PNG versions. The SVG is for your cutting machine, while the high-resolution PNG is vital if you plan to print the design on a home inkjet printer for a full-color background.
Understanding the Difference Between Cut Files and Printables
A frequent misunderstanding involves the distinction between a "cut file" and a "printable." Many beginners buy a file thinking it will magically appear on their paper when they load it into their machine. In reality, a pure cut file contains only the outlines for the die-cut shapes. If you do not have the corresponding printed background layer, your card will be nothing more than a transparent frame floating over the paper.
To avoid this, verify that the download includes a complete set of assets. For a polished A2 Graduation Card, you typically need:
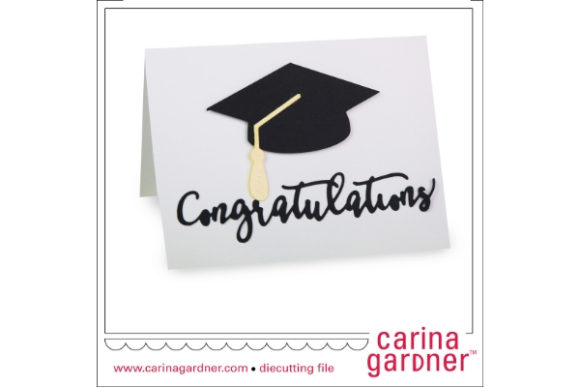
- The Main Graphic: The text and decorative elements in SVG format for cutting.
- The Background Layer: A high-quality PNG or PDF for printing the colors and patterns.
- The Assembly Guide: Instructions on which layer goes on top of which.
Without these components clearly defined, you risk creating a card that looks unfinished. Professional designers know that the magic lies in the layering—using cardstock colors to create depth through die-cuts rather than relying solely on flat ink. If the seller does not provide clear instructions on how to assemble these layers, the likelihood of a messy result increases significantly.
Material Choices That Make or Break the Design
Even with the perfect file, the wrong material choice can turn a stunning A2 Graduation Card into a flimsy disappointment. Beginners often rush to use thin cardstock or standard printer paper for the base layer, assuming it will hold up. While this might work for a quick note, it fails to support the weight of layered die-cuts. As soon as you add a second or third layer of vinyl or paper, the card may warp, buckle, or simply collapse under its own weight.
To ensure durability and a premium feel, opt for cardstock with a weight between 65 lb and 80 lb cover stock. This thickness provides the necessary rigidity to hold intricate cuts without bending. Furthermore, consider the color palette. A graduation theme often relies on specific colors like navy, gold, or school colors. If you cannot find the exact shade in pre-packaged cardstock, you might be tempted to print directly onto white paper. While this saves money, it lacks the tactile richness of textured cardstock. A simple trick used by professionals is to use a solid color cardstock base and then layer a contrasting SVG cutout on top. This creates a crisp, clean border that frames the message beautifully.
Scaling and Proportion Errors
p>Another area where projects frequently stumble is scaling. Digital designs are often created at specific dimensions, but users sometimes assume they can stretch the design to fill any space. If you take an A2 Graduation Card layout designed for a 4x6 inch photo and stretch it to fit a larger sheet, the proportions will distort. Text might become unreadable, and decorative flourishes could look stretched and unnatural.Always check the intended dimensions listed in the file description. If you need to adjust the size, do so uniformly. Most design software allows you to resize an object while holding a modifier key to maintain the aspect ratio. Remember that A2 refers to the finished folded size. Your cutting mat should accommodate the unfolded width, which is roughly 8.5 inches. If your design elements extend beyond the mat boundaries, you will have to split the file into two parts, which introduces alignment errors that are difficult to fix later.
Preparing for Success Before You Start Cutting
The difference between a hobbyist's mess and a professional's portfolio piece often comes down to preparation. Before you load your mat or click "make," take a moment to inspect the file structure. Open the SVG in your editing software and check the layer order. Are the text elements grouped correctly? Is the background separated from the foreground? If the file is a single ungrouped mass, you will spend valuable time untangling it instead of crafting.
Also, consider the type of vinyl you intend to use. For a graduation card, weeding (removing the excess vinyl) is a delicate process. Thin, cheap vinyl often tears during weeding, especially around fine details like the serifs in "Class of 2024." Investing in a high-quality brand of permanent vinyl ensures that the letters stay intact and the edges remain sharp. If you are unsure about the weeding process, practice on a scrap piece of the same material first. This small step prevents the heartbreak of ruining a custom-made card right before assembly.
Finally, always test your design on a scrap piece of cardstock before committing to your final materials. This "mock-up" phase allows you to catch errors in sizing, alignment, or color contrast. It is far better to waste a few scraps now than to ruin expensive specialty paper or miss a deadline for a graduation party. By taking the time to understand the file types, respecting the material limits, and planning your workflow, you ensure that your A2 Graduation Card is not just another item on a list, but a meaningful gift that stands out.
Whether you are a seasoned crafter or just starting your journey with a new cutting machine, paying attention to these details will elevate your results. The goal is to create something that feels personal and thoughtful, and that starts with choosing the right tools and avoiding the common traps that trip up even experienced users.